Difference between revisions of "Experimentation Mechanics (Game Mechanics)"
(→Navigation) |
(→Navigation) |
||
| Line 12: | Line 12: | ||
<div style="background:#ffffff; padding:0.2em 0.4em 0.2em 0.4em;"> | <div style="background:#ffffff; padding:0.2em 0.4em 0.2em 0.4em;"> | ||
{| style="border: 0; margin: 0;" cellpadding="6" | {| style="border: 0; margin: 0;" cellpadding="6" | ||
| − | | valign= "top" | + | | valign= "top" align="center" width= "270px" | |
| − | + | ||
{{Artisan Experimentation (Mech)}} | {{Artisan Experimentation (Mech)}} | ||
{{Architect Experimentation (Mech)}} | {{Architect Experimentation (Mech)}} | ||
Latest revision as of 20:24, 4 June 2008
| This article or section needs proper wiki formatting. |
Game Mechanics - Experimentation Mechanics
SWGANH Wiki is a repository of Star Wars Galaxies Developer information. This site is only meant to be used by SWGANH Developer team.
|
Experimentation OverviewExperimentation is the process by which a player increases the statistics on crafted items. Almost every item that can be experimented on has stats . These stats are tied to particular experimentation categories. For example, Wind generators have two categories: Experimental Efficiency (tied to extraction rate) and Experimental Storage (tied to hopper size). The experimental categories are displayed as percentages between 0% and 100%. The player experiments by allocating experimentation points of which whose quantity is determined by having experimentation modifiers. Every 10th value increase in experimentation modifiers, adds 1 experimentation point to the player. The success type of the experiment ("good success", "great success", "moderate failure") determines how much improvement (or deterioration) is applied to the experimentation percentage. For example, a "great success" increases the category + 7% for every point you spent; spend 5 points and get a great success, and the percentage increases by 35%. Stats on in-game items have a minimum value (at 0% experimentation) and a maximum value (at 100%). The actual value of the stat is calculated using a linear scale between these two points and the experimental percentage you reached. You take the minimum stat value and add the stat range (Max - Min) times the experimental percentage.
Stat = [Base value at 0% experimentation] + ( [ Increase ] x [Experimental Percentage]) To determine the Mass bonus gained from experimenting we take the base amount that the item starts with and plug in the maximum amount that it can be increased by along with the value we experiment the item to. The result is as follows: X-Wing Blueprint: Mass = 97500 + (5000 x E) with E = Experimental Percentage
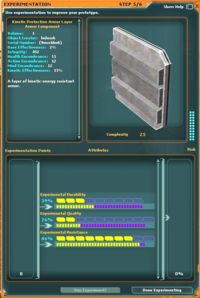
The Experimentation WindowAfter the initial assembly, a player is prompted to choose the option to experiment on an item if they are near a crafting station and are using a specialized tool. If the player chooses to experiment at crafting screen 4, they are then moved on to crafting screen 5 which is the allocation of experimentation points. On this screen there will be shown a bar to the leftmost, which contains the grouping of experimentation points available to be used.
In the middle are the allocation bars and the experimentation percentage meters under them. The allocation bars are what players use to place the points into. These blocks are typically measured by the amount of experimentation percentage that the player fills up in the experimentation percentage meter under it. For every 10% filled in the experimentation meter, an experimentation allocation box is filled up and turned yellow. Once the box is filled, it remains this way unless a failure of some type occurs. During the occurance of an experimentation failure, the obtained experimentation amount is reduced by a rate which is linked to the type of failure. For example a critical failure will reduce the experimentation meter by 14%. This means that 14% is subtracted from whatever the current amount is on the experimentation meter and allocation bar. If during an experiment, the player gets a failure that brings down their experimentation meter to 0%, they will be unable to increase the experimentation bar any further and must either create the item as it is, or destroy it by closing the crafting process.
Complexity Bar
Risk Meter
Experimentation Success Rates & RollsWhenever a player clicks the Run Experiment button on the experimentation window, a process occurs to determine the type of event that will be given to the player. The result a player receives is based upon two things which will be called the Success Rate, and the Roll.
Result = Rating + Roll Risk = 100 - Rating (Any rating at 100 or higher shows as zero risk)
Rating: Calculated from your experiment skill and modified by average MA on the resources and how many points you spend. 900 MA is a 10 skill bonus, 100 MA is a -10 skill penalty. Each extra point used at the same time is a -5 skill penalty. The formula for the rating is:
Average_MA is the MA of the resources weighted by relative quantity just like the experiment qualities and resources without MA are not counted. It is weighted by resource quantity If none of the resources have MA, the Average_MA is considered zero. Average_MA follows the same rules as if it had a hidden 'MA 100%' experiment line. Points_Used is how many points you spend at once. Points_Used is 1 if you only use one point. (If you try to spend points in multiple lines at once, you get penalized pretty badly and the formula changes a bit) With 75% chance, the red failure bar will show 25%. At 100% or above chance, the red bar is no longer visible. If you have 55 in skill, you get 100% with MA 500. At 100 skill you have 145% with MA 500. This means you can only test out the formula at a fairly low skill while the red bar is still there. Once you get 100% you can no longer get any failures, except criticals. But the system considers even marginally successful as a success. As you get higher above 100% the worst type of successes are gradually no longer possible. I believe that if your success rate is high enough, you can't get below great success either. But there are two parts affecting the experiment result and the other one is the experiment roll. The roll is basically a random number which is added to your success rate to give the final result. But the roll has special cases. Like RPGs where a roll of 1 or 20 on d20 will always hit or miss regardless of your base chance. So if the roll is below a certain number, it will force a critical failure, if it's above another number, it will force an amazing success. This ensures you can get amazing with almost no skill and that you can always get a critical. Fortunately things which gives bonus to your rolls are applied before checking for the special cases. Which is why you then get less critical and more amazing results. High enough bonus might theoretically prevent any criticals at all. This means that once you are above 100% (no red bar) you will only get failures from the roll and not from your skill. So things which affects the roll are more important to avoid failures. Like being in a research city or drinking Bespin Port. Both the success rate and the roll matters for getting more amazing successes, but for being able to use more points at once, probably only the skill matters. And there is a possibilty that there is a cap on your skill in this formula. But then you can't use the failure bar to test it out since your skill is too high to even get a red line. A force sensitive master crafter with +25 clothing would have a mean success rate without a cap. The MA is the surprise factor. Having 100 in MA will be just like losing 10 skill points, while 900 in MA is a 10 point bonus. Unfortunately this MA is considered zero if none of the resources have MA effectively giving a -12.5 skill penalty. I strongly suspected Complexity to affect the chance, since it rises as you experiment. But it doesn't affect the chance at all. Also testing with various levels of crafting stations from public to 40+, there is no difference either. But both of them may affect the roll instead. The only way to find out would be to do tons of experiments with the same materials and use statistics. I remember an old post from someone who did this testing, but can't seem to find it again. Anyone with a link ? And being in a research city doesn't affect the success formula either. But that is documented as affecting only the roll, so no surprise there. I have seen noticably better results from rolls in a research city than outside, but haven't done any tests on stations or complexity.
Things that Affect Success Rate and Rolls are:
Experimentation Success TypesAfter having made a roll, the system chooses a type of event that will occur. These events can come in the form of being positive or detrimental to the construction of the item. Here is a listing of the types of effects that are possible during experimentation and a description of what they do to the construction process.
The Experimentation LinesWhen there are two different formulas for the same experiment line, there are actually 2 experiment percentages internally. But you are only shown an average of those 2. For example, an experimentation line with 2 properties, Attack Speed and Maximum Damage where the weighted ratios for Attack Speed are 50% OQ and 50% DR and the weighted ratios for Maximum Damage are 25% CD, 75% SR. Each time you experiment one point, a separate roll is made for both of those percentages. But the result is not applied directly, instead a factor is used which tries to compensate for one being lower. For example if one is 20% and the other is 30%, you will see 25%. Then the roll for the first one is multiplied by 1.2, while the second is multiplied by 0.8. This will bring the factors closer and closer together until you reach the the first maximum. Here is where the trouble starts. The system will continue to use this compensation even though you have already maxed one percentage. So you will get less and less on the advancing percentage the further you get from the the maxed one as it is trying pointlessly to divert more to the maxed one. I'm not sure if it's supposed to work this way, or if it was an oversight by the developers. The bottom line is that it's always a bad idea to have percentages too far apart on the same experiment line. One more thing. Since there are 2 rolls, you can get different successes on them. The status you see is the lowest of the two. That is why you see far less amazing successes on the final buff pack than simple components. You will only see an amazing success if both gets an amazing one. The funny thing is that it seems to continue to roll for the one that is maxed out. I only got a 'good success' reported after maxing out the duration in my tests. But the power still increased as if I had gotten a normal great result. Source References |

